
During WWDC 2023, Apple introduced some new ways of making advanced SwiftUI animations. The two major additions to this are Keyframes and Phased animations.
Phased SwiftUI Animation
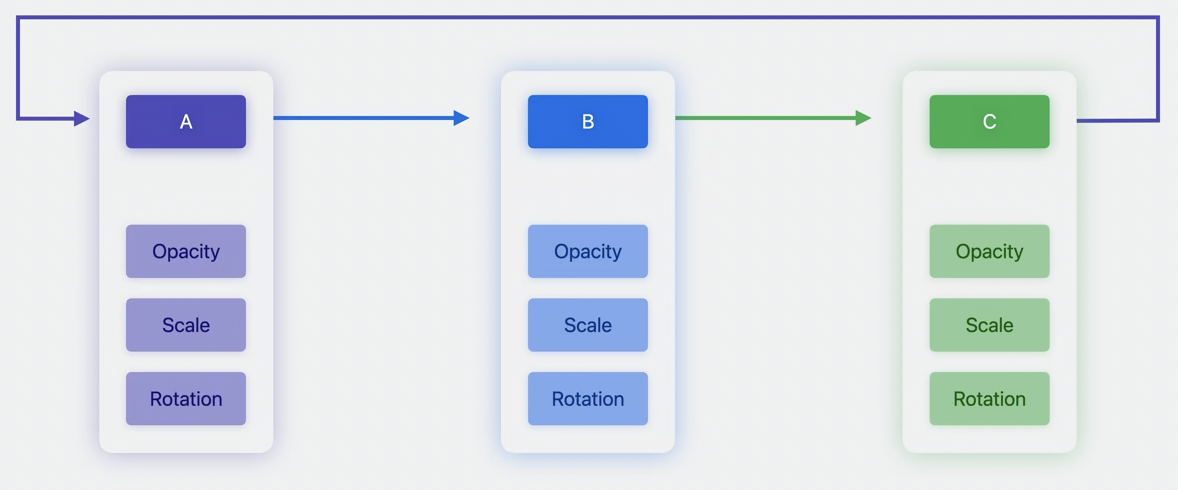
This new API utilizes a Phase animator to transition through different phases. Each phase will then transition to its new state with the specified animation, allowing looping animations to be created easily.
Let’s see how we create this simple animation in SwiftUI.
Image(systemName: "exclamationmark.triangle.fill")
    .resizable()
    .frame(width: 100, height: 100)
    .symbolRenderingMode(.palette)
    .phaseAnimator([false, true]) { content, phase in
        content
            .opacity(phase ? 1 : 0.5)
            .foregroundStyle(.white, phase ? .red : .orange)
    }
In order to animate the icon, we need to add a Phase Animator view modifier that can take two parameters, an array of states, and a view builder closure that takes two parameters.
The first parameter represents the modified view. The second parameter is the current phase. For this example, we are only using boolean values to define two phases. It’s in this closure that the magic happens. You can add modifiers to the content parameter and change the data of the view depending on the phase
When the view appears, the first phase is active - in this case, false. Then SwiftUI transitions to the next phase and animates the view changes.
If you want more control over the animation, call the closure animation that returns the animation to use when transitioning to the next phase.
.phaseAnimator([false, true]) { content, phase in
    content
            .opacity(phase ? 1 : 0.5)
            .foregroundStyle(.white, phase ? .red : .orange)
    } animation: { phase in
            .easeInOut(duration: 1)
    }
Here, we give it an EaseInOut animation for a smooth transition that will last one second.
We can go even further by having more than two phases. Let’s make this animation:
The emoji will go up and then scale down to return to its position and size.
First of all, we need to create an enum in which we define the different phases. In this enum, we add computed properties that define the effects that will be applied to the view.
enum Phase: CaseIterable {
    case initial, move, scale

    var verticalOffset: Double {
        switch self {
        case .initial: 0
        case .move, .scale: -60
        }
    }

    var scale: Double {
        switch self {
        case .initial, .move: 1
        case .scale: 0.5
        }
    }
}
@State var toggleAnimation = false

Text("👆")
    .font(.system(size: 100))
    .phaseAnimator(Phase.allCases, trigger: toggleAnimation) { content, phase in
        content
            .offset(y: phase.verticalOffset)
            .scaleEffect(phase.scale)
    } animation: { phase in
        switch phase {
        case .initial: .smooth
        case .move: .easeInOut(duration: 0.3)
        case .scale: .spring(duration: 0.3, bounce: 0.7)
        }
    }
As you can see, we are passing the newly created phases to the animator. We also give it a state variable to trigger the animation.
The content closure will apply the values of the phase to the view.
In the animation closure, we define for each phase the type of SwiftUI animation we want for the transition.
Keyframe SwiftUI Animations
Keyframes are predefined animations in SwiftUI that can animate properties independently unlike Phases.
Keyframes are a great way to define values at a specific time during an animation.
To demonstrate Keyframe SwiftUI Animations, let's try to create a bouncing ball:
First thing first, we need to add to our view a Keyframe Animator
keyframeAnimator<Value>(initialValue: Value, trigger: some Equatable, @ViewBuilder content: @escaping @Sendable (PlaceholderContentView<Self>, Value) -> some View, @KeyframesBuilder<Value> keyframes: @escaping (Value) -> some Keyframes)And we need to define our Keyframe. It will contain all the properties that can be modified during the animation
struct Keyframe {
    var offsetY: CGFloat = 0
}
Here is how it looks like:
@State var enableAnimation = false

VStack {
    Spacer()

    Circle()
        .fill(.orange)
        .frame(width: 200, height: 200)
        .overlay(
            Image(systemName: "globe")
            .resizable()
            .frame(width: 200, height: 200)
        )
        .keyframeAnimator(initialValue: Keyframe(), trigger: enableAnimation) { view, frame in
            view
                .offset(y: frame.offsetY)
        } keyframes: { frame in
            KeyframeTrack(\.offsetY) {
                SpringKeyframe(250, duration: 0.5, spring: Spring(duration: 0.4, bounce: 0.4))
            }
        }

    Spacer()

    Button("Toggle Animation") {
        enableAnimation.toggle()
    }
    .fontWeight(.bold)
    .padding(.bottom, 80)
}
As you can see, in the content closure, we can add modifiers to the view with values from the given frame.
In the keyframe closure, we define KeyFrame Tracks. A Keytrack allows you to animate an effect with its own timing.
In the example above, the Keytrack will animate the vertical offset with a Spring effect.
We can push a bit further by adding another Keytrack that will run in parallel and modify the height of the ball when it reaches the bottom to give it a squishy look.
So first, we will add a property in the Keyframe that we defined at the beginning
struct Keyframe {
    var scale: CGFloat = 1
    var offsetY: CGFloat = 0
}
Now we can add a scaleEffect on the Y property to only rescale the height of the view. Then, we need to add another Keytrack for the scale property.
.keyframeAnimator(initialValue: Keyframe(), trigger: enableAnimation) { view, frame in
    view
        .scaleEffect(y: frame.scale)
        .offset(y: frame.offsetY)
    } keyframes: { frame in
        KeyframeTrack(\.offsetY) {
            CubicKeyframe(250, duration: 0.5)
            SpringKeyframe(.zero, duration: 0.5, spring: .bouncy)
            CubicKeyframe(250, duration: 0.3)
            CubicKeyframe(150, duration: 0.3)
            SpringKeyframe(200, duration: 0.3, spring: .bouncy)
        }
        KeyframeTrack(\.scale) {
            CubicKeyframe(1, duration: 0.3)
            SpringKeyframe(0.5, duration: 0.2, spring: .bouncy)
            SpringKeyframe(1, duration: 0.6, spring: .bouncy)
            SpringKeyframe(0.7, duration: 0.2, spring: .bouncy)
            SpringKeyframe(1, duration: 0.2, spring: .bouncy)
        }
    }
There are different types of Keyframe to interpolate between values:
- CubicKeyframe: A keyframe that uses a cubic curve to smoothly interpolate between values.
- LinearKeyframe: A keyframe that uses simple linear interpolation.
- MoveKeyframe: A keyframe that immediately moves to the given value without interpolating.
To get SwiftUI animations right will often require fine tuning and experimentation.

Keyframes give you more control over the animation but come at a cost. Each frame that you define for the animation will refresh the view, so it’s best to avoid using Keyframe animations while running expensive operations.